Here are 24 important things to do after you install Ubuntu 24.04 LTS (NOBLE NUMBAT). These include making the system look and work better, adding useful apps, making it run faster, saving battery on laptops, and making the desktop nicer.
Update System
The first thing to do after installing Ubuntu is to update the system. To do this, open the terminal and enter the below command to retrieve the latest package information from the sources and upgrade all the packages.
sudo apt update && sudo apt upgradeEnable Ubuntu Pro
Ubuntu 24.04 LTS is supported for five years of software updates. However, If you prefer longer support, consider getting the Ubuntu Pro subscription, which provides software updates for 7+ Years.
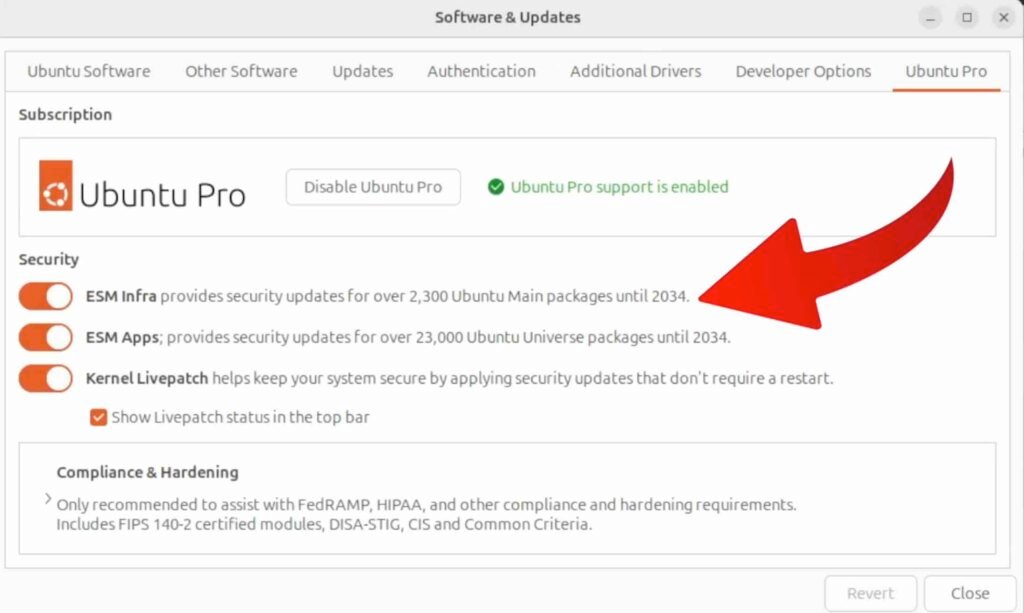
It’s free for personal use and for the enterprise, you will need to contact Canonical directly for pricing. So 12 years of software updates is a long support period for a linux distribution ever.
Use XORG 0r Wayland
By default, ubuntu uses the Wayland display server if you have installed NVIDIA drivers. If your PC or laptop has an Nvidia graphics card that is not functioning as intended, disable Wayland and use the XORG session.
To switch between XORG and WayLand, log out of Ubuntu. Then click on your username and select the settings gear icon at the bottom right to choose XORG or Wayland. After making your selection login in back with your password.
Replace APT
There may be instances when you become frustrated with apt due to the slow download speeds. To fix this issue consider replacing apt with NALA. You can install NALA by executing this command.
sudo apt install nalaIt offers features such as parallel downloads, faster download speeds, Colour-coded text & easy installation. To take advantage of Nala’s faster download speeds, run the below command, that filters the fastest mirrors.
By default, Nala will filter the top 16 mirrors, and you can add the top 6 to your source list.
sudo nala fetchInstall GDEBI
GDEBI is a convenient way to install Debian packages not available through the Ubuntu software center or repositories. Simply run the command inside a terminal to set up GDEBI.
sudo nala install gdebiNow download any Deb package, right–click, and choose to install with GDEBI.
Get Warp AI Terminal
By default, the built-in terminal looks awful in Ubuntu. So consider using Warp Terminal. Download and install the deb package from this link. Create a free account and start using it.
Warp operates on a concept called blocks which are interactive wrappers around the executed shell commands and is powered by AI, so when you encounter errors while running a command, you can built in warp AI to solve the issue.
Other features of the warp terminal include built-in git support, intelligent code completion, community workflows, and more.
Remove Snap from Ubuntu If needed
By default, ubuntu comes with Snap support which many don’t like. Snap packages tend to occupy more disk space and take longer to load. Eventually, slowing down the app’s performance.
If you face such issues, consider removing snap packages to improve Ubuntu’s performance. Other Wise leave it untouched. Anyway, I have made a dedicated video regarding this topic, see this link.
Setup Flatpak
Flatpak is a Distribution independent App Store that allows running GUI applications within an isolated environment. You can install Flatpak by running the below command.
sudo nala install flatpakThen, add a FlatHub repository to gain access to thousands of GUI applications including Android Studio, VSCode, Google Chrome, and many more.
flatpak remote-add --if-not-exists flathub https://dl.flathub.org/repo/flathub.flatpakrepoInstall Your Favorite Web browser
Ubuntu ships with Mozilla Firefox pre-installed, but many users prefer other web browsers. I like to surf the internet using Google Chrome web browser, which offers many features in addition to web browsing.
Just download the deb file from the following link, and install it.
Another decent option is the open-source Chromium web browser.
sudo nala install chromium-browserInstall GPU Drivers
If you have a dedicated graphic card such as NVIDIA, it’s recommended to install Proprietary GPU drivers for graphic-intensive applications.
Ubuntu provides a secret command to install GPU Drivers. Within the terminal type this command to see a list of drivers.
sudo ubuntu-drivers devicesLook For the recommended driver and select its name. Then install the driver using APT or NALA. For Eg:
sudo nala install nvidia-driver-535Install OBS Screen Recorder
OBS Studio is a free, open-source screen recording program that can capture screen recordings with the system or external audio. It also supports hardware encoding and uses GPU to produce high-quality screen recordings.
OBS is a popular choice for recording gameplay, presentations, and more. This is the best tool to have in Ubuntu and can be installed with the following command.
sudo apt install obs-studioRun Local LLMS Like ChatGPT
In the world of generative AI tools, you can install and run chat GPT like LLMS offline on Ubuntu using Ollama. It is a free and open-source tool that helps run large language models locally. You can Run LLAMA3, Mistral, Tiny LLaMA, and other models on Ubuntu.
First install a CURL package by running the below command:
sudo nala install curlThen copy the below code paste it inside the terminal, and run the script. This will set up OLLAMA in a few minutes.
curl -fsSL https://ollama.com/install.sh | shIt may detect for NVIDIA GPU on your computer and uses it to generate faster output. Now, let’s try installing LLAMA3 by running the below command.
ollama run llama3Congratulations, now you can ask anything to the model like ChatGPT to find the answers and works without the internet.
For More Models See this link
Install Docker
Docker is a worthy tool to install after setting up Ubuntu. It simplifies the process of deploying and managing applications by providing lightweight containers that encapsulate everything needed to run the software.
So If you are a developer or coder then you must install docker on Ubuntu by running the following commands.
sudo nala install docker.iosudo systemctl enable dockersudo systemctl start dockerInstall GnomeTweaks
Gnome-Tweaks allows you to tweak and control the behavior of the gnome desktop environment. Install gnome-tweaks by running this command.
sudo nala install gnome-tweaksOnce installed, open the tweaks application. With this tool, you can customize the user interface based on your liking. For instance, you can enable or disable maximize & minimize buttons from the windows title bars.
Additionally, Choose the Windows section & enable Center new Windows, to have applications open in the center of the screen.
Install Gnome Shell Extensions Manager
An extension is software that allows you to take your GNOME customization to the next level. These extensions allow you to apply themes, add fancy app transitions, as well as additional features such as blur effects.
Install Gnome Shell Extensions Manager by running the below command.
sudo nala install gnome-shell-extension-managerI recommend installing these extensions to create a more futuristic gnome experience.
Blur My Shell / Astra Monitor / Compact Quick Settings / Burn My Windows / / User Themes
Also Watch this video to see Top 10 best extensions for Gnome desktop.
Must Install Packages
Installing essential packages can enhance your Ubuntu Linux experience. Run the following command to install Linux headers and additional useful packages:
sudo nala install htop neofetch bpytop clang cargo libc6-i386 libc6-x32 libu2f-udev samba-common-bin exfat-fuse default-jdk curl wget unrar linux-headers-$(uname -r) linux-headers-generic git gstreamer1.0-vaapi unzip ntfs-3g p7zip htop neofetch bpytop git gcc make curl bzip2 tarMust Install Apps
You can boost your Ubuntu workflow by installing GUI applications like Resources, VLC, Transmission, Obsidian, and Spotify. Use Flatpak Or Nala to install them easily.
sudo nala install vlcflatpak install flathub com.spotify.Clientflatpak install flathub com.transmissionbt.Transmissionflatpak install flathub com.obsproject.Studiohttps://flathub.org/apps/net.nokyan.ResourcesSetup Auto-CPUFREQ
“Some users, on specific hardware, may notice a higher battery consumption rate on Ubuntu Linux than on Windows, especially on laptops. To address this issue, the easiest way is to solve this problem on Ubuntu by installing Auto-CPUFREQ.
This is a very useful tool that actively monitors the battery state, CPU usage, and temperatures, and improves battery life without making any compromises.
To set up autocpufreq, copy and paste the below line of code into the terminal.
git clone https://github.com/AdnanHodzic/auto-cpufreq.git
cd auto-cpufreq && sudo ./auto-cpufreq-installer
Once it’s done, go to the app drawer and open the GUI tool. Now, activate it to run as a daemon service by clicking on the install button.
It uses a default Profile to optimize the performance and battery life. If you want peak performance you can enable Performance mode. If you don’t want High performance enable power save for longer battery life.
Setup Steam To Play Windows Games
Installing Steam on Ubuntu can be a great addition for gamers who want to play a wide range of Windows games using Proton. Go a head and run the command to setup steam.
sudo nala install steamThen, type steam and press enter to setup runtime environment. Once it’s done setting up the steam environment log in with your Steam account.
Then enable proton translation layer to play windows games. Click on Steam, from the top left and choose settings.
Then select compatibility, enable Steam Play for all other titles and restart the Steam. Now again go to the compatibility settings, where you set proton to run other titles.
It uses Proton Experimental by default, and you do not have to change that in many cases.
Once you are done with the compatibility settings, all you need to do is download the game as usual and launch it from Steam.
Run Windows Apps
If you have switched to Ubuntu from Windows, and looking for a way to run some Windows apps, you can use bottles. Bottles introduce a new way to handle Windows binaries using runner environments. You can choose between a Gaming and Software environment based on the type of software you want to start.
I have run specific Windows apps like IDM and NotePad++. Keep in mind, that you should not expect to run every Windows app, it’s just an experimental build and works with very few Windows apps. Setup Bottles With Flatpak:
flatpak install flathub com.usebottles.bottlesSetup QEMU / KVM To create Virtual machines
Running Virtual machines in Ubuntu is very easy. If your system supports high-end hardware, it’s recommended to set up QEMU KVM which allows to creation of virtual machines.
Go ahead and install QEMU / KVM and Virt-Manager by running the below command.
sudo apt install qemu-kvm qemu-utils libvirt-daemon-system libvirt-clients bridge-utils virt-manager ovmfOnce it’s done, open Virt-Manager & grab any operating system image, and start running it inside a virtual machine.
Customise Dock & Ubuntu Desktop
Ubuntu provides minimal customization to tweak your desktop. It offers light and dark themes as well as accent Colours in the “Appearance” settings. You can customize desktop icons and adjust the dock’s appearance.
Within the dock section, you can move the dock panel to the bottom or right side of the screen. You also have the option to turn off the panel mode, this way the dock looks much cleaner and better.
Use Nightlight & Adjust Display Settings
Night light is a key feature that is essential during the night times to reduce Eye Strain. It adjusts the Colour of your display according to the time of day, providing a warmer color in the evening.
To enable night light, navigate to settings, select displays, and click on night light. Here you can enable the nightlight, schedule the activation time, and adjust the Colour temperature.
You can also use fractional scaling to adjust the display size if you are running Ubuntu on a large monitor. It’s also recommended to increase the size of all text in the user interface using the accessibility feature.
Tweak TouchPad Settings
If you have installed Ubuntu on a laptop, you need to adjust the TouchPad settings. Go to Touchpad and mouse settings, and choose the touchpad.
You can adjust the pointer speed, and toggle on tap to click to simulate the selection without the need to press any buttons. Additionally, you can adjust the scrolling method and direction.
Ubuntu Restricted codecs
By default, Ubuntu cannot play video formats like MOV, AVI, MKV, and other media content due to a lack of codecs.
To popular media files, install media codecs by typing the below command.
sudo apt install ubuntu-restricted-extrasMinimize to click
When you click an application shortcut on the Dock panel, the system opens the application. However, when you click it again, nothing happens.
You can make GNOME Minimize the application if you click on its icon when the application is open. There is no app to do this, but you can use the below command to fix such an issue.
gsettings set org.gnome.shell.extensions.dash-to-dock click-action 'minimize-or-previews'Setting up Firewall
UFW is a popular firewall that protects your computer from network traffic and blocks malicious software. It is recommended to set up a firewall on Ubuntu by running this command.
sudo nala install ufwsudo systemctl enable ufwsudo systemctl start ufwUFW allows you to have full control over enabling and disabling ports. For example, if you’re running an SSH server on port 22, you can disable this port to prevent connections from remote computers.
sudo ufw deny 22/tcpCustomize Keyboard Shortcuts
Keyboard shortcuts are one of the most useful things that speed up the user experience. For example, pressing ctrl + alt + T opens up a terminal. Likewise, ubuntu allows you to create shortcuts that trigger specific actions.
Head over to settings – choose keyboard and select keyboard shortcuts. Using this section, you can map a shortcut key to do something. For example, choose launcher – Home directory & set a shortcut to open the Home Directory.
Use Stacer
Stacer is an open-source system optimizer and application monitor that helps users manage the entire system with different aspects. Stacer is an all-in-one system utility that allows you to manage system resources, software management, disk monitoring, daemon services, startup applications, and more.
Stacer also supports System Cleaner, which helps remove unnecessary log or cache files and empty the trash on your system. To install stacer run the below command:
sudo nala install stacerConclusion
That’s pretty much it, these are the 24 things to do after installing Ubuntu 24.04 LTS. You can use this guide with any Ubuntu Version. Let me know what you think about it in the comments section below. Watch My Youtube Video
