Dual Boot Arch Linux and windows 11/10 . Install Arch Linux With GUI alongside windows 11. This is a complete step by step tutorial of Arch linux installation 2024.
This Article walks you through the installation guide of Arch Linux With Plasma Desktop and dual Boot with windows 11. Using dual boot you can setup windows 11 and arch Linux on the same drive.
The Pre-requisites of this video
* You need Windows 11 or Windows 10 installed on your PC or laptop.
* An 8 GB or higher USB drive to create a bootable disk with ArchLinux
* At least 40GB of free space reserved from your existing drive.
Creating Free Space For ARCH LINUX
- Open command prompt and type DISKMGMT to access disk manager.
- View connected drives and their partitions.
- Identify the target drive (e.g., Drive 0) with its partitions.
- Choose the C Or D or Any Drive for ArchLinux and right-click on it.
- Select “shrink volume” to allocate free space for ArchLinux.Allocate a minimum of 40GB or more (type in MegaBytes, e.g., 200,000 MB).Click “shrink” to create unallocated free space

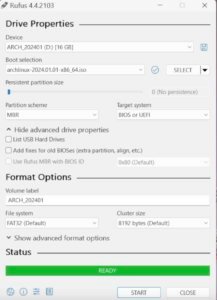
Download ArchLinux & Make Bootable USB
- Download the Arch ISO from HERE
- Connect a USB stick to your computer.Use Rufus to burn the downloaded ISO image to the USB drive.
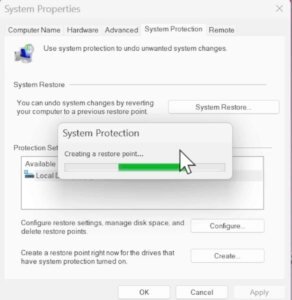
Create System Restore Point
It is recommended to create a System Restore point before installing Archlinux. This option allows you to take a snapshot of the current state of the system. If something goes wrong with the Arch installation, you can use this backup to restore your system to normal.
BIOS Settings
- Reboot your computer.
- During the reboot, enter the BIOS settings using the keyboard shortcut (commonly F2, F9, or ESC).
- In UEFI BIOS, enable USB boot and set the USB drive as the primary boot order.
- Disable secure boot in the BIOS settings.
- If available, enable options like Microsoft’s third-party UEFI.
- Consider clearing any keys or certificates after disabling secure boot.
- Save the changes in the BIOS settings.
- Your system should now boot into ArchLinux from the USB drive.
- If the boot fails, use the boot menu to load Arch install media.
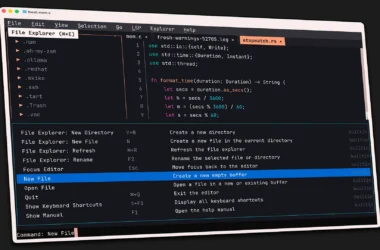
Increase Console FONT
Now, on your monitor, you will see a terminal expecting input. Note that the mouse functionality is disabled so you need to rely on the keyboard
Type setfont ter-132n and press enter to increase the size of the console.
Using iWCTL for WIFI Connection
If using built-in WiFi support, use the iwctl tool to connect to the internet.
- To find list of network interfaces type:
iwctl device list - To search for WIFI Networks type:
iwctl station wlan0 get-networks - To connect to WIFI network type:
iwctl station wlan0 connect WIFI_NAME - Once connected run :
ping google.comto check internet connection (Interrupt Ping with CTRL + C) - Then type the command to syncnorize the package database:
pacman -Sy - Then Type this command :
pacman -S archlinux-keyring
Create Partitions For Arch Linux
- Type
lsblkto list all connected drives on the PC. - Identify the main drives, focusing on SDA or NVME (ignore loops).
- NVME0n1 is MY drive with Windows 11, and SDA is the BootableUSB.

- Create partitions for Arch Linux using earlier free space.
- Type cfdisk /dev/nvme0n1 and press enter.
- Use arrow keys for selection and enter key for confirmation.

- Scroll to free space and create 3 partitions: EFI, ROOT, and swap.
- Create EFI partition (e.g., 800MB) with type EFI System.
- Create ROOT partition (e.g., 20GB or higher) with type Linux file system.
- Use remaining free space for swap partition with type Linux SWAP.
- Write changes to alter the disk and exit from CFDisk.

Formatting Partitions
- Type lsblk to view all newly created partitions
- NVME0N1P5 for EFI, NVME0N1P6 for Root, and NVME0N1P7 for Swap.
- Format the Arch EFI Partition (e.g., NVME0N1p5)
mkfs.fat -F32 /dev/nvme0n1p5 - Format the root partition (e.g., NVME0N1p6)
mkfs.ext4 /dev/NVME0N1p6 - Format the swap partition (e.g., nvme0n1p7)
mkswap /dev/nvme0n1p7
Mount Partitions
- Mount the root partition (e.g., NVME0n1p6) to the “mnt” directory.
mount /dev/nvme0n1p6 /mnt - Create a directory inside “
mnt” and name it “boot,” then mount the EFI partition to this directory.
mkdir /mnt/boot
mount /dev/nvme0n1p5 /mnt/boot
- Enable the swap partition by typing
swapon /dev/nvme0n1p7 - Verify proper mounting of all partitions by typing
lsblk

Installing ArchLinux
Now, it’s time to install the Arch Linux to the root partition which Is mounted to /mnt.
pacstrap -i /mnt base base-devel linux linux-headers linux-firmware amd-ucode sudo git nano vim neofetch htop cmake make bluez bluez-utils networkmanager cargo gcc mpvRun the above command to start installing the base system of Arch Linux. Accept the defaults. This will take some time, sit back, relax, and don’t interrupt the computer.
Generate File System Table (FSTAB)
It’s time to generate a file system table. If you notice, the NVME partitions are mounted to the live session of USB, but when we boot arch from the main drive we need to tell the system to mount all these partitions to the same location.
genfstab -U /mnt >> /mnt/etc/fstabCHROOT To Newley Installed system
So far we are running everything from the Live Session. It’s Time to enter, into the drive where we have installed Arch Linux. For that type:
arch-chroot /mnt
Now you can see the prompt has changed to something else, which means we have entered into the actual drive as a root user.
Change Root Password
Then type passwd and set the root password. This is a superuser account and is known as a top-tier user in Linux.
Adding a Standard User
Also, we are going to create a standard user by tying the below command and replace the username placeholder with your name
useradd -m -g users -G wheel,storage,video,audio -s /bin/bash USER_NAMEThen set the password by typing
passwd USER_NAMENow, we have added this new user to the wheel group and other groups. The Wheel group allows the user to access root privileges with a sudo command. For that, we need to edit the sudoers file. Type the below command
EDITOR=nano visudo
Uncomment the line in the image and save the changes with CTRL + O and CTRL + X to Exit.
SetupTimezone/Region
- Use
ln -sf /usr/share/zoneinfo/and press tab to see the list of available options. - Choose the appropriate timezone, for example
ln -sf /usr/share/zoneinfo/Asia/Kolkata /etc/localtime - Synchronize the current time with the hardware clock using
hwclock --systohc

Setup System Language
It’s time to set a system language by generating a locale. Type the below command
nano /etc/locale.genScroll all the way and uncomment the below line in the image and save the changes. This is going to tell the system to use American English as the system locale.

Now type the below commands to generate a locale & Config file
locale-genecho "LANG=en_US.UTF-8" >> /etc/locale.confSetup Host Name
Now, type the below command to set up the hostname of this computer. In this case, I am going to say “archlinux” and save the changes
echo "archlinux" >> /etc/hostnameThen type nano /etc/hosts and add the below lines.

Make sure you replace the GREEN part with your hostname and save the changes
Grub-Installation
It’s time to install the grub boot loader which is going to help boot arch Linux. Type the below commands
pacman -S grub efibootmgr dosfstools mtoolsgrub-install --target=x86_64-efi --efi-directory=/boot --bootloader-id=GRUBgrub-mkconfig -o /boot/grub/grub.cfgEnable Services
systemctl enable bluetoothsystemctl enable NetworkManagerThen exit from Chroot by typing exit & Unmount the partitions by typing
umount -lR /mntShutdown the computer and eject the USB Stick
Connecting TO WIFI Using NMCLI
Once the system is restarted you can see the grub menu. From here you can boot into only Arch for now and Windows 11 boot entry will be missing.
We are going to fix that issue in a moment. For now, let’s just boot into Arch Linux. Now log in with your user account & increase the console font by typing below command
setfont -d- Check the status of all network interfaces:
nmcli dev status - Turn on the WIFI Radio:
nmcli radio wifi on. - View available wifi networks with the command specified
nmcli dev wifi list - Connect to wifi using the relevant command, replace placeholders with your network information and enclosing the password in double-quotes
sudo nmcli dev wifi connect WIFI_NAME password "WIFI_PASSWORD" - Update the PACMAN database with:
sudo pacman -Sy
Installing GUI
It’s time to install the desktop environment. For Plasma Desktop Run the below commands
sudo pacman -S xorg sddm plasma-meta plasma-wayland-session kde-applications noto-fonts noto-font-emoji ttf-dejavu ttf-font-awesomesudo systemctl enable sddmFor GNOME Desktop
sudo pacman -S xorg gdm gnome gnome-extra sudo systemctl enable gdmThen Reboot the system
sudo reboot nowand this time Arch Linux will boot With a GUI Environment
Fix Discover App Backend
The first thing to do after installing ArchLinux is to fix the Discover app backend. To do so open KONSOLE and type the below command to install flatpak and use it as a backend for discover.
sudo pacman -Sy flatpakInstall NVIDIA Drivers (Optional)
If you have a modern NVIDIA graphic card, it’s recommended to install NVIDIA proprietary drivers.
"This is completely optional, installing this package on older systems may or may not work, so please refer to this article"
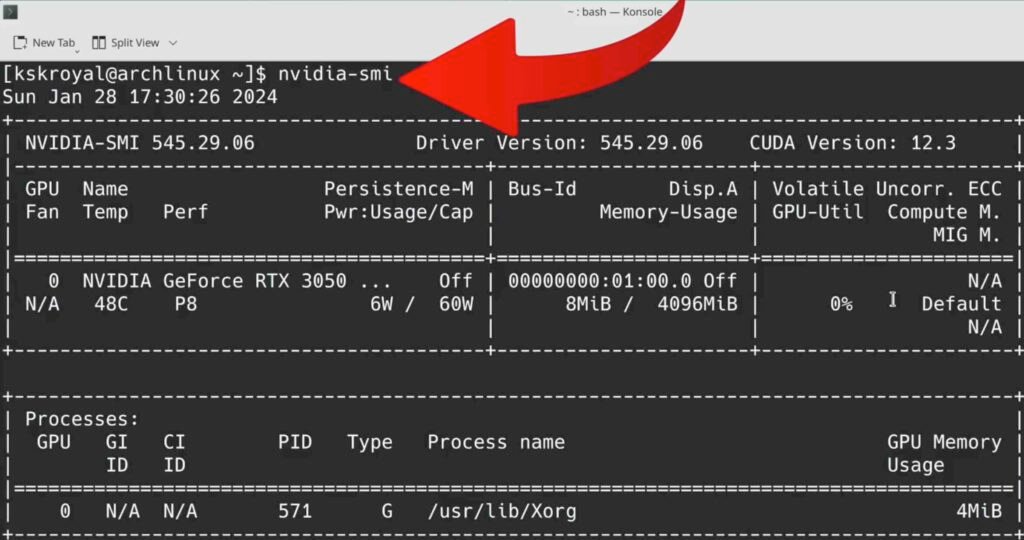
Anyway, inside the konsole you can type the below command to set up NVIDIA drivers.
sudo pacman -Sy nvidia Once it’s done, reboot your computer. Now if I type nvidia-smi command inside the terminal you can see it shows the NVIDIA driver information.
Adding Windows Entry To GRUB
- Install OS-Prober with the command provided
sudo pacman -Sy os-prober - Edit the grub file,
sudo nano /etc/default/grub - Set the
GRUB_TIMEOUT=20 - Scroll to the bottom and uncomment the line related to os-prober.

Save changes with ctrl + o and exit with ctrl + x.
Run grub-mkconfig -o /boot/grub/grub.cfg to update the grub configuration.Verify that Windows boot manager is detected.

Reboot the system. Using the grub menu you can boot into either Arch or Windows 11
Removing ArchLinux From Dual Boot
- Reboot your computer and boot into Windows 11.
- Open Disk Management utility by typing diskmgmt in the search bar.
- Delete each new partition by right Clicking created during ArchLinux installation, starting with swap and root partitions.

- “Note that the LINUX EFI partition cannot be deleted using Disk Management“
- Open Command Prompt as an administrator and type
DISKPART - Type
list diskto view all connected drives, select the appropriate drive with
select disk 0 - Type
list partitionto view all partitions on the selected drive. - Identify the Arch EFI partition (e.g., partition 5).

- Select the Arch EFI partition with
select partition [number] - Type
DELETE PARTITION OVERRIDEto remove the partition. - Verify the deletion in Disk Management; the free space is now available.
- Utilize the gained free space to merge it back into Windows 11 partitions