A standard terminal gets the job done, but a professional development environment should be fast, functional, and beautiful. In this guide, we’ll walk through how to install the ultra-fast Ghostty terminal, customize it with a “frosted glass” aesthetic, and supercharge your shell using Oh My Posh.
Install Homebrew (The macOS Essentials)
Before we dive into the terminal itself, we need Homebrew, the essential package manager for macOS.
- Go to brew.sh and copy the installation command.
- Paste it into your default terminal and hit enter.
- Crucial Step: Once finished, run the “Next steps” commands provided in the terminal output to add Homebrew to your PATH.
- Restart your terminal and verify the installation:
brew --version
Install the Best Coding Font
To ensure icons and symbols render correctly, we’ll install JetBrains Mono Nerd Font:
brew install --cask font-jetbrains-mono-nerd-fontInstalling Ghostty Terminal
Ghostty is a high-performance, hardware-accelerated terminal that isn’t on the App Store yet.
- Visit ghostty.org and click Download for macOS.
- Open the
.dmgfile and drag Ghostty into your Applications folder. - Launch Ghostty via Spotlight (
Cmd + Space).
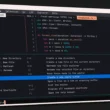
Initially, it will look plain. That’s because Ghostty is built for speed; the beauty comes from your custom configuration file.
Customizing Ghostty (The “Glass” Look)
Ghostty uses a configuration file instead of a traditional settings menu. This allows for instant updates without restarting.
To open your config: Press Command + , (comma).
The “Pro” Configuration
Copy and paste the following into your config file to get a vibrant, blurred, and highly functional setup:
theme = "light:Horizon Bright,dark:Broadcast"

font-family = "JetBrainsMono NFM Regular"

font-size = 20

window-padding-x = 10
window-padding-y = 10

window-decoration = true

cursor-style=block

adjust-cell-height=35%

mouse-scroll-multiplier = 2

window-colorspace = "display-p3"

copy-on-select = clipboard

window-padding-balance = true

window-save-state = always

macos-titlebar-style = transparent

background-opacity = 0.8

background-blur = 90
Tip: You can see all available themes by running ghostty +list-themes in your terminal.
Supercharge your Shell with Oh My Posh
Now that the terminal looks great, let’s make the prompt smarter using Oh My Posh.
- Install Oh My Posh: Visit the official docs and run the brew install command.
- Create your theme file: Run the command to initialize a
themes.jsonfile.touch ~/themes.json
- Configure ZSH: Open your
.zshrcfile using Nano:nano ~/.zshrc
- Paste these lines at the bottom:
eval "$(oh-my-posh init zsh --config ~/themes.json)"export TERM=xterm-256color
- Setting the TERM to 256color unlocks full vibrant color support for your themes.
Choosing a Theme
Visit the Oh My Posh Themes page, copy the JSON of a theme you love, and paste it into your themes.json file. Save and run exec zsh to see the transformation!
Adding ZSH Plugins (Auto-Suggestions)
The final touch is ZSH Auto-suggestions. This plugin remembers your history and suggests commands as you type—a massive productivity boost.
- Install the plugin:
brew install zsh-autosuggestions
- The add the below line to your
.zshrcfile at the bottom.source $HOMEBREW_PREFIX/share/zsh-autosuggestions/zsh-autosuggestions.zsh
- Restart your terminal or run
exec zsh.
Conclusion
You now have a modern, high-performance terminal setup that isn’t just a tool, but a joy to use. With Ghostty’s speed and Oh My Posh’s visual intelligence, your workflow will feel faster and more organized.