In this video, I will show you how to install Kali Linux ARM64 Desktop Edition on Apple Silicon Macs, including M1, M2, M3, M4, M5 using VirtualBox.
With VirtualBox, you can now run Kali Linux inside a virtual machine (VM) on any Apple Silicon Mac. For demonstration purposes, I used a MacBook Air with an M4 chip in this video. However, the procedure remains the same for any Mac.
Download VirtualBox & Kali Linux ISO
To install Kali Linux on an Apple Silicon Mac, ensure you have at least 40GB of free space on macOS. Open your web browser, go to the official VirtualBox website, and click the download button.
As of this video, VirtualBox 7.2.4 is the latest version available.
- If you have an Intel Mac, download the Intel version.
- For Apple Silicon Macs, download the ARM64 version.
While the download is in progress, also download the VirtualBox Extension Pack. Additionally, download the Kali Linux 2025 ISO for Apple Silicon ARM64 from the official Kali website.
Once all files are downloaded, place them in an easily accessible folder for convenience.
Install VirtualBox
- Double-click the VirtualBox DMG file.
- Double-click the PKG icon to start the installer.
- Click Continue, then select Install for all users of this computer and click Install.
- Enter your admin password when prompted.
- Once installed, double-click the Extension Pack to install it.
- Close and reopen VirtualBox.
Next, open Finder, navigate to the Applications folder, locate VirtualBox, and open it.
Creating a Virtual Machine for Kali
- Click New to create a virtual machine.
- Name the VM and select the folder where VM files will be stored.
- Set the OS to Linux and the Version to Debian ARM 64-bit.
- Check the option to Skip Unattended Installation, then click Hardware.
- Allocate RAM and CPU cores:
- I used 6GB of RAM (out of 16GB) and 6 CPU cores (out of 10) for better performance.
- Click Hard Disk and allocate at least 20GB of storage.
- Click Finish to complete the VM setup.
To optimize performance:
- Select the VM and click Settings.
- In Expert Mode, go to the Display tab.
- Increase Video Memory to the maximum and keep the Graphics Controller as VMSVGA.
- Do not enable 3D acceleration, as it is not yet supported on Apple Silicon Macs.
- Under Storage, select Empty, then import the Kali ARM64 ISO file.
- Leave the remaining options as default and click OK to save the settings.
Start the Virtual Machine
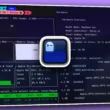
- Click Start to boot the VM.
- Click inside the VM window to interact with it.
- Press the Left Command key to release the cursor back to the host OS.
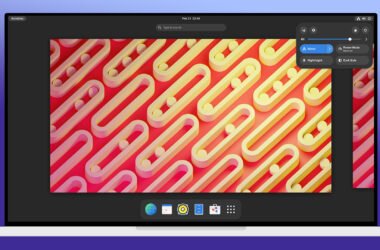
- If the VM window appears small, go to View > Scaled Mode, then double-click the window’s title bar to maximize it.
Use the arrow keys to scroll through the options, select Graphical Install, and press Enter to boot into the live setup.
Kali Linux Installation
- Select your system language, location, and keyboard layout.
- Set a hostname, then click Continue.
- Leave the Domain Name field empty.
- Create a user account and password.
- Choose Use Entire Disk, select the virtual disk, and opt for All Files in One Partition.
- Finish partitioning and continue with the installation.
After a few minutes, you will be prompted to choose a Desktop Environment:
- XFCE (Recommended for performance)
- GNOME (Also works well)
Select your preferred environment and complete the installation. Once finished, click Continue to reboot the VM. VirtualBox will automatically eject the installation media.
Update APT Source List
After installing Kali, the first step is to update the package sources. Open a terminal and run:
sudo apt update && sudo apt upgrade -y
Install VirtualBox Guest Additions
To enable full-screen resolution and improve VM functionality, install VirtualBox Guest Additions:
- Open a terminal and install Linux headers & Other Dependencies:
sudo apt install linux-headers-generic gcc git curl wget perl make cmake - Then reboot the system.
- Now from the VirtualBox menu, go to Devices > Insert Guest Additions CD Image.
- Open the file manager, find the Guest Additions CD, and copy all files to the Documents directory.
- Open a terminal and navigate to the Documents directory:
cd ~/Documents - List the files:
ls - Change permissions for the installer:
chmod +x VBoxLinuxAdditions-arm64.run - Run the installer:
sudo ./VBoxLinuxAdditions-arm64.run - Disable Scaled Mode for better results.
- Restart the VM to apply the changes.
Enable Display Scaling
If the UI appears too small, enable display scaling:
- Open Settings Manager.
- Click on Kali HiDPI Mode.
Performance
Since VirtualBox on Apple Silicon lacks 3D acceleration, animations and transitions may appear choppy. It relies on software rendering instead of GPU acceleration. However, overall performance is smooth, and applications like VS Code work without any major issues.
(Bonus) Deleting Kali Linux VM
If you decide to remove Kali Linux:
- Turn off the VM.
- In the VirtualBox main interface, right-click the VM and select Delete.
Conclusion
That’s it! This is how you can install Kali Linux on Apple Silicon Macs using VirtualBox for free. If you have any questions or doubts, leave a comment below, and I’ll try to help you.